by Ethan Shackelford
Introduction
I recently encountered a device whose software I wanted to reverse engineer. After initial investigation, the device was determined to be using a processor based on Analog Devices' Blackfin architecture. I had never heard of or worked with this architecture, nor with the executable format used by the system, and little to no support for it was present in existing reverse engineering tooling. This article will cover the two-week journey I took going from zero knowledge to full decompilation and advanced analysis, using Binary Ninja. The code discussed in this article can be found on my GitHub.
Special thanks to everyone on the Binary Ninja Slack. The Binary Ninja community is excellent and the generous help I received there was invaluable.
Overview
While the x86 architecture (and increasingly, ARM) may dominate the home PC and server market, there is in fact a huge variety of instruction set architectures (ISAs) available on the market today. Some other common general-purpose architectures include MIPS (often found in routers) and the Xtensa architecture, used by many WiFi-capable IoT devices. Furthermore many specialized architectures exist, such as PIC (commonly found in ICS equipment) and various Digital Signal Processing (DSP) focused architectures, including the Blackfin architecture from Analog Devices, which is the focus of this article.
This article, will explore various techniques and methodologies for understanding new, often more obscure architectures and the surrounding infrastructure which may be poorly documented and for which little to no tooling exists. This will include:
- Identifying an unknown architecture for a given device
- Taking the first steps from zero knowledge/tooling to some knowledge/tooling,
- Refining that understanding and translating it to sophisticated tooling
- An exploration of higher-level unknown constructs, including ABI and executable file formats (to be covered in Part 2)
The architecture in question will be Analog Devices' Blackfin, but the methodologies outlined here should apply to any unknown or exotic architecture you run across.
Identifying Architecture
When attempting to understand an unknown device, say a router you bought from eBay, or a guitar pedal, or any number of other gadgets, a very useful first step is visual inspection. There is quite a lot to PCB analysis and component identification, but that is outside of the scope of this article. What we are interested in here is the main processor, which should be fairly easy to spot -- It will likely be the largest component, be roughly square shaped, and have many of the traces on the PCB running to/from it. Some examples:

More specifically, we're interested in the markings on the chip. Generally, these will include a brand insignia and model/part number, which can be used together to identify the chip.

Much like Rumpelstiltskin, knowing the name of a processor grants you great power over it. Unlike Rumpelstiltskin, rather than magic, the source behind the power of the name of a processor is the ability to locate it's associated datasheets and reference manuals. Actually deriving a full processor name from chip markings can sometimes take some search-engine-fu, and further query gymnastics are often required to find the specific documentation you want, but generally it will be available. Reverse engineering completely undocumented custom processors is possible, but won't be covered in this article.
Pictured below are the chip markings for our target device, with the contrast cranked up for visibility.

We see the following in this image:
- Analog Devices logo, as well as a full company name
- A likely part number, "ADSP-BF547M"
- Several more lines of unknown meaning
- A logo containing the word "Blackfin"
From this, we can surmise that this chip is produced by Analog Devices, has part number ADSP-BF547M, and is associated with something called Blackfin. With this part number, it is fairly easy to acquire a reference manual for this family of processors: the Analog Devices ADSP-BF54x. With access to the reference manual, we now have everything we need to understand this architecture, albeit in raw form. We can see from the manual that the Blackfin marking on the chip is in fact referring to a processor family, which all share an ISA, which itself is known also known as Blackfin. The the Blackfin Processor Programming Reference includes the instruction set, with a description of each operation the processor is capable of, and the associated machine code.
So that's it, just dump the firmware of the device and hand-translate the machine code into assembly by referencing instructions in the manual one by one. Easy!
Just Kidding
Of course, translating machine code by hand is not a tenable strategy for making sense of a piece of software in any reasonable amount of time. In many cases, there are existing tools and software which can allow for the automation of this process, broadly referred to as "disassembly." This is part of the function served by tools such as IDA and Binary Ninja, as well as the primary purpose of less complex utilities, such as the Unix command line tools "objdump." However, as every ISA will encode machine instructions differently (by definition), someone, at some point, must do the initial work of automating translation between machine code and assembly the hard way for each ISA.
For popular architectures such as x86 and ARM, this work has already been done for us. These architectures are well supported by tools such as IDA and Binary Ninja by default, as well as the common executable file formats for these architectures, for example the Executable and Linkable Format (ELF) on linux and Portable Executable (PE) on Windows. In many cases, these architectures and formats will be plug-and-play, and you can begin reverse engineering your subject executable or firmware without any additional preperation or understanding of the underlying mechanisms.
But what do you do if your architecture and/or file format isn't common, and is not supported out of the box by existing tools? This was a question I had to answer when working with the Blackfin processor referenced earlier. Not only was the architecture unfamiliar and uncommon, but the file format used by the operating system running on the processor was a fairly obscure one, binary FLAT (bFLT), sometimes used for embedded Linux systems without a Memory Management Unit (MMU). Additionally, as it turned out and will be discussed later, the version of bFLT used on Blackfin-based devices didn't even conform to what little information is available on the format.
Working Smarter
The best option, when presented with an architecture not officially supported by existing tooling, is to use unofficial support. In some cases, some other poor soul may have been faced with the same challenge we are, and has done the work for us in the form a of a plugin. All major reverse engineering tools support some kind of plugin system, with which users of said software can develop and optionally share extra tooling or support for these tools, including support for additional architectures. In the case of Binary Ninja, the primary focus for this article, "Architecture" plugins provide this kind of functionality. However there is no guarantee that a plugin targeting your particular architecture will either exist, or work the way you expect. Such is open source development.
If such a convenient solution does not exist, the next step short of manually working from the reference manual requires getting our hands dirty and cannibalizing existing code. Enter the venerable libopcodes. This library, dating back at least to 1993, is the backbone that allows utilities such as objdump to function as they do. It boasts an impressive variety of supported architectures, including our target Blackfin. It is also almost entirely undocumented, and its design poses a number of issues for more extensive binary analysis, which will be covered later.
Using libopcodes directly from a custom disassembler written in C, we can begin to get some meaningful disassembly out of our example executable.

However, an issue should be immediately apparent: the output of this custom tool is simply text, and immutable text at that. No semantic analysis has or can take place, because of the way libopcodes was designed: it takes machine code supplied by the user, passes it through a black box, and returns a string which represents the assembly code that would have been written to produce the input. There is no structural information, no delineation of functions, no control flow information, nothing that could aid in analysis of binaries more complex than a simple "hello world." This introduces an important distinction in disassembler design: the difference between disassembly and decomposition of machine code.
Disassembly
The custom software written above using libocpdes, and objdump, are disassemblers. They take an input, and return assembly code. There is no requirement for any additional information about a given instruction; to be a disassembler, a piece of software must only produce the correct assembly text for a given machine instruction input.
Decomposition
In order to produce correct assembly code output, a disassembler must first parse a given machine instruction for meaning. That is, an input sequence of ones and zeros must be broken up into its constituent parts, and the meaning of those parts must be codified by some structure which the disassembler can then translate into a series of strings representing the final assembly code. This process is known as decomposition, and for those familiar with compiler design, is something like tokenization in the other direction. For deeper analysis of a given set of machine instructions (for example a full executable containing functions) decomposition is much more powerful than simple disassembly.
Consider the following machine instruction for the Blackfin ISA:
Hex: 0xE2001000; Binary: 1110 0010 0000 0000 0001 0000 0000 0000
Searching the reference manual for instructions which match this pattern, we find the JUMP.L instruction, which includes all 32 bit values from 0xE2000000 to 0xE2FFFFFF. We also see in this entry what each bit represents:
We see that the first 8 bits are constant - this is the opcode, a unique prefix which the processor interprets first to determine what to do with the rest of the bits in the instruction. Each instruction will have a unique opcode.
The next 8 bits are marked as the "most significant bits of" something identified as "pcrel25m2," with the final 16 bits being "least significant bits of pcrel25m2 divided by 2." The reference manual includes an explanation of this term, which is essentially an encoding of an immediate value.
Based on this, the machine instruction above can be broken up into two tokens: the opcode, and the immediate value. The immediate value, after decoding the above instruction's bits [23:0] as described by the manual, is 0x2000 (0 + (0x1000 * 2)). But how can the opcode be represented? It varies by architecture, but in many cases an opcode can be translated to an associated assembly mnemonic, which is the case here. The E2 opcode corresponds to the JUMP.L mnemonic, as described by the manual.
So then our instruction, 0xE2001000 translates into the following set of tokens:
Instruction {
    TokenList [
        Token {
            class: mnemonic;
            value: "JUMP.L";
        },
        Token {
            class: immediate;
            value: 0x2000;
        }
    ]
}
For a simple text disassembler, the processing of the instruction stops here, the assembly code JUMP.L 0x2000 can be output based on the tokenized instruction, and the disassembler can move on to the next instruction. However, for more useful analysis of the machine code, additional information can be added to our Instruction structure.
The JUMP.L instruction is fairly simple; the reference manual tells us that it is an unconditional jump to a PC-relative address. Thus, we can add a member to our Instruction structure indicating this: an "Operation" field. You can think of this like instruction metadata; information not explicitly written in the associated assembly, but implied by the mnemonic or other constituent parts. In this case, we can call the operation OP_JMP.
Instruction {
    Operation: OP_JMP;
    TokenList [
        Token {
            class: mnemonic;
            value: "JUMP.L";
        },
        Token {
            class: immediate;
            value: 0x2000;
        }
    ]
}
By assigning each instruction an Operation, we can craft a token parser which does more than simply display text. Because we are now encoding meaning in our Instruction structure, we can interpret each component token based on its associated meaning for that instruction specifically. Taking JUMP.L as an example, it is now possible to perform basic control flow analysis: when the analysis tool we are building sees a JUMP.L 0x2000, it can now determine that execution will continue at address PC + 0x2000, and continue analysis there.
Our Instruction structure can be refined further, encoding additional information specific to it's instruction class. For example, in addition to the unconditional PC-relative jump (JUMP.L), Blackfin also offers conditional relative jumps, and both absolute and relative jumps to values stored in registers.
For conditionality and whether a jump is absolute or relative, we can add two more fields to our structure: a Condition field and a Relative field, as follows.
Relative unconditional JUMP.L 0x2000:
Instruction {
    Operation: OP_JMP;
    Condition: COND_NONE;
    Relative: true;
    TokenList [
        Token {
            class: mnemonic;
            value: "JUMP.L";
        },
        Token {
            class: immediate;
            value: 0x2000;
        }
    ]
}
Absolute unconditional to register JUMP P5:
Instruction {
    Operation: OP_JMP;
    Condition: COND_NONE;
    Relative: false;
    TokenList [
        Token {
            class: mnemonic;
            value: "JUMP";
        },
        Token {
            class: register;
            value: REG_P5;
        }
    ]
}
Conditional jumps appear more complex represented in assembly, but can still be represented with the same structure. CC is a general purpose condition flag for the Blackfin architecture, and is used in conditional jumps. The standard pattern for conditional jumps in Blackfin code looks like this:
CC = R0 < R1;
IF CC JUMP 0xA0;
...
Conditional relative IF CC JUMP 0xA0:
Instruction {
    Operation: OP_JMP;
    Condition: COND_FLAGCC;
    Relative: true;
    TokenList [
        Token {
            class: mnemonic;
            value: "JUMP";
        },
        Token {
            class: immediate;
            value: 0xA0;
        }
    ]
}
We do not need tokens for the IF and CC strings, because they are encoded in the Condition field.
All instructions can be broken down this way. Our decomposer takes machine code as input, and parses each instruction according to the logic associated with its opcode, producing a structure with the appropriate Operation, tokens and any necessary metadata such as condition, relativity, or other special flags.
Our initial categorization of instruction based on opcode looks like this:

And a simple example of decomposing the machine instruction (for the unconditional relative jump):
For more complex instructions, the decomposition code can be much more involved, but will always produce an Instruction structure conforming to our definition above. For example, the PushPopMultiple instruction [--SP] = (R7:5, P5:1) uses a rather complicated encoding, and more processing is required, but still can be represented by the Instruction structure.

The process of implementing decomposition logic can be somewhat tedious, given the number of instructions in the average ISA. Implementing the entirety of the Blackfin ISA took about a week and a half of effort, referencing both the Blackfin reference manual and the existing libopcodes implementation. The libopcodes opcode parsing logic was lifted nearly verbatim, but the actual decomposition of each instruction had to be implemented from scratch due to the text-only nature of the libopcodes design.
Analysis
Now we have our decomposer, which takes in machine instructions and outputs Instruction objects containing tokens and metadata for the input. I've said before "this information is useful for analysis," but what does this actually mean? One approach would be to write an analysis engine from scratch, but thankfully a powerful system already exists for this purpose: Binary Ninja and its plugin system. We'll be exploring increasingly more sophisticated analysis techniques using Binary Ninja, starting with recreating the basic disassembler we saw before (with the added perks of the Binary Ninja UI) and ending up with full pseudo-C decompiled code.
We'll be creating a Binary Ninja Architecture Plugin to accomplish our goal here. The precise details for doing so are outside the scope of this article, but additional information can be found in this excellent blog post from Vector35.
Basic Disassembly
First, we'll recreate the text-only disassembler from earlier in the article, this time as a Binary Ninja plugin. This can be accomplished by defining a function called GetInstructionText in our plugin, which is responsible for translating raw machine code bytes to a series of tokens for Binary Ninja to display. Using our jump Instruction structure again, the process can be represented in pseudocode as follows:
for token in Instruction.TokenList {
    switch (token.class) {
    case mnemonic:
        BinaryNinjaOutput.push(InstructionTextToken, token.value);
    case immediate:
        BinaryNinjaOutput.push(IntegerToken, token.value);
    etc...
    }
}
This step completely ignores the operation and metadata we assigned each object earlier; only the tokens are processed to produce the corresponding instruction text, in other words, the assembly. After implementing this, as well as the necessary Binary Ninja plugin boilerplate, the following output is produced:
Control Flow Analysis
This looks a bit nicer than the text disassembler, but is essentially serving the same function. The code is interpreted as one giant, several hundred kilobyte function with no control flow information to delineate functions, branches, loops, and various other standard software constructs. We need to explicitly tell Binary Ninja this information, but thankfully we designed our decomposer in such a way that it already supplies this information inside the Instruction structure. We can single out any Operation which affects control flow (such as jumps, calls, and returns) and hint to Binary Ninja about how control flow will be affected based on the constituent tokens of those instructions. This process is implemented in the GetInstructionInfo function, and is as follows:

With this implemented, the output is substantially improved:

We now have individual functions, and control flow is tracked within and between them. We can follow branches and loops, see where functions are called and where they call to, and are much better equipped to actually begin to make sense of the software we are attempting to analyze.
Now, we could stop here. This level of analysis combined with Binary Ninja's built-in interactivity is more than enough to make reasonable progress with your executable (assuming you know the assembly language of your target executable, which you certainly will after writing a disassembler for it). However, the next step we'll take is where Binary Ninja and its architecture plugins really shine.
Lifting and Intermediate Languages
At the time of its invention the concept of the assembler, which generates machine code based on human-readable symbolic text, was a huge improvement over manual entry of machine code by a programmer. It was made intuitive through the use of certain abstractions over manually selecting opcodes and allowed a programmer to use mnemonics and other constructs to more clearly dictate what the computer program should do. You could say that assembly is a higher level language than machine code, in that it abstracts away the more direct interactions with computer hardware in favor of ease of programming and program understanding.
So how might we improve the output of our plugin further? While certainly preferable to reading raw machine code, assembly language isn't the easiest to follow way of representing code. The same kinds of abstractions that improved upon machine code can be applied again to assembly to produce a language at an even higher level, such as Fortran, C, and many others. It would be beneficial for our reverse engineering efforts to be able to read our code in a form similar to those languages.
One way to accomplish this is to design a piece of software which translates assembly to the equivalent C-like code from scratch. This would require a full reimplementation for every new architecture and is the approach taken by the Hexrays decompilers associated with IDA -- the decompiler for each architecture is purchased and installed separately, and any architecture not explicitly implemented is entirely unsupported.
Another approach is available, and it once again takes its cue from compiler design (which I will be oversimplifying here). The LLVM compiler architecture uses something called an Intermediate Representation (IR) as part of the compilation process: essentially, it is the job of the compiler frontend (clang for example) to translate the incoming C, C++, or Objective-C code into LLVM IR. The compiler backend (LLVM) then translates this IR into machine code for the target architecture. Credit to Robin Eklind for the following image from this blog covering LLVM IR:

An important feature of this compiler architecture is its ability to unify many input languages into a single representational form (LLVM IR). This allows for modularity: an entire compiler need not be created for a new language and architecture pair, and instead only a frontend which translates that new language into LLVM IR must be implemented for full compilation capabilities for all architectures already supported by the LLVM backend.
You may already see how this could be turned around to become useful processing machine code in the other direction. If some system can be designed which allows for the unification of a variety of input architectures into a single IR, the heavy lifting for translating that representation into something more conducive to reverse engineering can be left to that system, and only the "front-end" must be implemented.
Allow me to introduce Binary Ninja's incredibly powerful Binary Ninja Intermediate Languages, or BNIL. From the Binary Ninja documentation on BNIL:
The Binary Ninja Intermediate Language (BNIL) is a semantic representation of the assembly language instructions for a native architecture in Binary Ninja. BNIL is actually a family of intermediate languages that work together to provide functionality at different abstraction layers. BNIL is a tree-based, architecture-independent intermediate representation of machine code used throughout Binary Ninja. During each analysis step a number of optimizations and analysis passes occur, resulting in a higher and higher level of abstraction the further through the analysis binaries are processed.

Essentially, BNIL is something akin to LLVM IR. The following flow chart is a rough representation of how BNIL is used within Binary Ninja:

The portion of an Architecture plugin that produces the Lifted IL as described by that chart is known as the lifter. The lifter takes in the Instruction objects we defined and generated earlier as input, and based on the operation, metadata, and tokens of each instruction describes what operations are actually being performed by a given instruction to Binary Ninja. For example, let's examine the process of lifting the add instruction for the ARMv7 architecture.
Assembly:
add r0, r1, 0x1
Instruction object resulting from decomposition:
Instruction {
    Operation: OP_ADD;
    TokenList [
        Token {              // Instruction mnemonic
            class: mnemonic;
            value: "add";
        },
        Token {              // Destination register
            class: register;
            value: REG_R0;
        },
        Token {              // Source register
            class: register;
            value: REG_R1;
        },
        Token {              // Second source (here immediate value)
            class: immediate;
            value: 0x1;
        }
    ]
}
Based on the assembly itself, the ARM reference manual, and our generated Instruction object, we understand that the operation taking place when this instruction is executed is:
Add 1 to the value in register r1
Store the resulting value in register r0
Now we need some way of indicating this to Binary Ninja. Binary Ninja's API offers a robust collection of functions and types which allow for the generation of lifted IL, which we can use to this end.
Relevant lifter pseudo-code (with simplified API calls):
GetInstructionLowLevelIL(const uint8_t *data, uint64_t addr, size_t &len, LowLevelILFunction &il) {
    Instruction instr = our_decompose_function(data, addr);
    switch (instr.Operation) {
    ...
    case OP_ADD:
        REG dst_reg = instr.TokenList[1];
        REG src_reg = instr.TokenList[2];
        int src2    = instr.TokenList[3];
        il.AddInstruction(
            il.SetRegister(
                il.Register(dst_reg)
                il.Add(
                    il.Register(src_reg),
                    il.Const(src2)))
        );
    ...
    }
}
The resulting API call reads "set the register dst_reg to the expression 'register src_reg plus the constant value src2'", which matches the description in plain english above.
If after completing the disassembly portion of your architecture plugin you found yourself missing the abject tedium of writing an unending string of instruction decomposition implementations, fear not! The next step in creating our complete architecture plugin is implementing lifting logic for each distinct Operation that our decomposer is capable of assigning to an instruction. This is not quite as strenuous as the decomposition implementation, since many instructions are likely to have been condensed into a single Operation (for example, Blackfin features 10 or so instructions for moving values into registers; these are all assigned the OP_MV Operation, and a single block of lifter logic covers all of them).
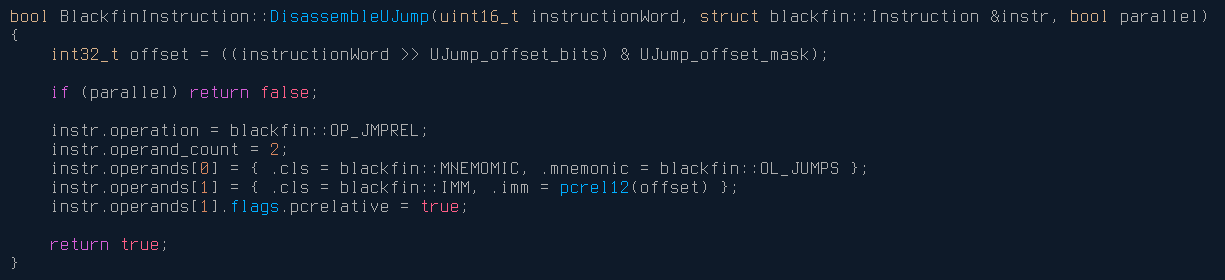
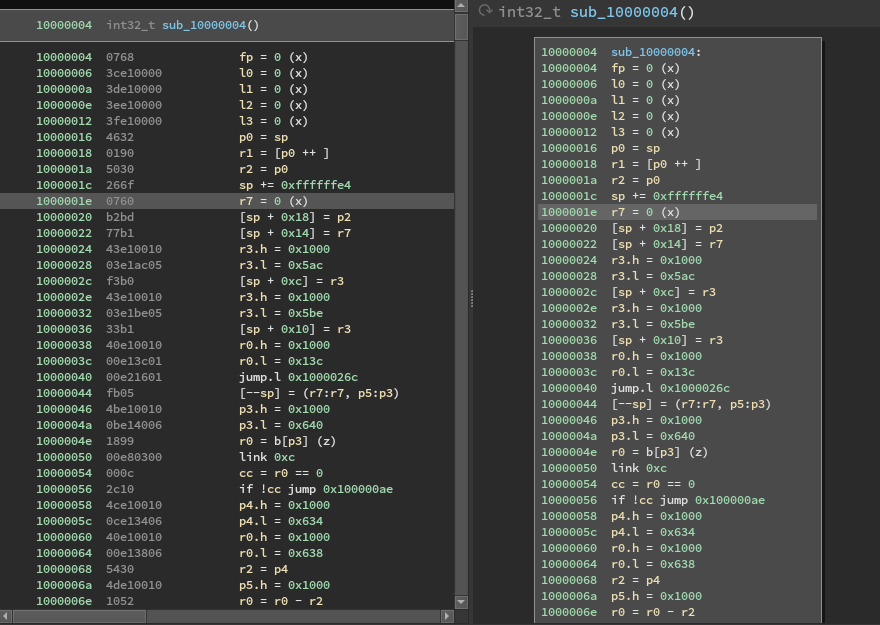
Once the lifter has been implemented, the full power of Binary Ninja is available to us. In the Binary Ninja UI, we can see the lifted IL (on the right) our plugin now generates alongside the disassembly (on the left):

You're forgiven for thinking that it is a bit underwhelming for all the work we've put in to get here. However, take another look at the Binary Ninja analysis flow chart above. Now that our plugin is generating lifted IL, Binary NInja can analyze it to produce the higher-level IL representations. For reference, we'll be looking at the analysis of a Blackfin executable compiled from the following code:
int
add4(int x, int y, int z, int j)
{
    return x + y + z + j;
}

int
main()
{
    int x, y, z, j;
    x = 1;
    y = 2;
    z = 3;
    j = 0x12345678;
    return add4(x, y, z, j);
}
Finally, let's take a look at the high-level IL output in the Binary Ninja UI (right), alongside the disassembly:

As you might guess, reverse engineering the code on the right can be done in a fraction of the time it would take to reverse engineer pure assembly code. This is especially true for an obscure architecture that might require frequent trips to the manual (what does the link instruction do again? Does call push the return address on the stack or into a register?). Furthermore this isn't taking into account all of the extremely useful features available within Binary Ninja once the full analysis engine is running, which increase efficiency substantially.
So, there you have it. From zero knowledge of a given architecture to easily analyzable pseudo-C in about two weeks, using just some elbow grease and Binary Ninja's excellent BNIL.
...
Keen readers may have noticed I carefully avoided discussing a few important details -- while we do now have the capabilities to produce pseudo-C from raw machine code for the Blackfin architecture, we can't just toss an arbitrary executable in and expect complete analysis. A few questions that still need to be answered:
- What is the function calling convention for this platform?
- Are there syscalls for this platform? How are they handled?
- What is the executable file format? How are the segments loaded into memory? Are they compressed?
- Where does execution start?
- Is dynamic linking taking place? If so, how should linkage be resolved?
- Are there relocations? How are they handled?
Since this article is already a mile long, I'll save exploration and eventual answering of these questions for an upcoming Part 2. As a preview though, here's some fun information: Exactly none of those questions have officially documented answers, and the unofficial documentation for the various pieces involved, if it existed in the first place, was often outright incorrect. Don't put away that elbow grease just yet!
References
- arch-blackfin - The architecture plugin built and discussed in this article, including standalone decomposer/disassembler.
- Blackfin-IDA-Pro-Plugin - IDA Pro plugin for Blackfin disassembly based on libopcodes.
- Basic disassembly with libopcodes - Introduction to using the libopcodes library to create a basic disassembler.
- ADSP-BF54x Blackfin Processor Hardware Reference
- Blackfin Processor Programming Reference
- Binary Ninja Documentation
No comments:
Post a Comment
Note: Only a member of this blog may post a comment.